

티스토리 뷰
Section 01. 조합 선택자
- 예제 html
    <div>
        <h2>조합선택자</h2>
        <article class="content-card">
            <a href=#><img src="images/music01.jpg" alt="음악 공연 무대"></a>
            <span class="badge">AI MUSIC</span>
            <h3>PNU 감성 <span>플레이리스트</span></h3>
            <p>AI가 만든, 부산대의 오늘 <br>
                <a class="round-button" href="#"><span class="mored">›more</span></a>
            </p>

        </article>
        <article class="content-card">
            <img src="images/music02.jpg" alt="음악 공연 무대">
            <span class="badge">AI MUSIC</span>
            <h3>PNU 감성 플레이리스트</h3>
            <p>AI가 만든, 부산대의 오늘 <br>
                <a class="round-button" href="#"><span class="mored">›more</span></a>
            </p>
        </article>
</div>- css 폴더에 style06.css 외부스타일파일을 만들어서 적용하자.
/* 전체 선택자 */
* {
    box-sizing: border-box;
}

body {
    margin: 0;
    background-color: #eef2f8;
    color: #172550;
}
1. 조합 선택자란?
조합 선택자는 둘 이상의 기본 선택자를 결합하여 HTML 요소의 위치와 관계를 기준으로 대상을 선택하는 방법이다.
다음 HTML 구조를 살펴보자.
        <article class="content-card">
            <a href=#><img src="images/music01.jpg" alt="음악 공연 무대"></a>
            <span class="badge">AI MUSIC</span>

            <p>AI가 만든, 부산대의 오늘 <br>
                <a class="round-button" href="#"><span class="mored">›more</span></a>
            </p>
            <h3>PNU 감성 플레이리스트</h3>
        </article>
이 구조에서 <img>, <span>, <h3>, <p>, <a>는 모두 .content-card 안에 포함되어 있다. 조합 선택자를 사용하면 이러한 부모·자식·형제 관계를 이용하여 요소를 선택할 수 있다.
2. 조합 선택자의 종류
| 종류 | 표기 | 의미 |
| 자손 선택자 | A B | A 안에 있는 모든 B를 선택한다. |
| 자식 선택자 | A > B | A의 바로 아래 자식 B를 선택한다. |
| 인접 형제 선택자 | A + B | A 바로 다음에 있는 B를 선택한다. |
| 일반 형제 선택자 | A ~ B | A 뒤에 있는 모든 형제 B를 선택한다. |
3. 자손 선택자
자손 선택자는 선택자 사이를 공백으로 구분한다.
.content-card h3 {
    color: #111a43;
    font-size: 16px;
}
.content-card 안에 있는 모든 <h3> 요소를 선택한다.
.content-card h3
       ↓       ↓
   조상 요소   내부의 h3
.content-card h3 span{font-weight:bold;color:red;}첫 번째 선택자는 .content-card 내부의 모든 <h3>을 선택한다. 두 번째 선택자는 .content-card 내부의 <h3> 안에 있는 <span>을 선택한다.
4. 자식 선택자
자식 선택자는 > 기호를 사용한다. 특정 요소의 바로 아래 단계에 있는 자식만 선택한다.
.content-card > a {border:2px solid grey;}다음 구조에서 <a>는 .content-card의 직접적인 자식이다.
.content-card의 바로 아래에 있는 <a>만 선택한다. 더 깊은 단계에 있는 <a>은 선택하지 않는다.
자손 선택자와 자식 선택자의 차이
/* header 안의 모든 a를 선택한다. */
header a {
    color: navy;
}

/* header 바로 아래에 있는 a만 선택한다. */
header > a {
    color: red;
}
기존 소스에서 <a>는 <header> 바로 아래에 있지 않고 <div>와 <nav> 안에 있다. 따라서 header > a로는 선택되지 않는다.
5. 인접 형제 선택자
인접 형제 선택자는 + 기호를 사용한다. 특정 요소 바로 다음에 있는 형제 요소 하나를 선택한다.
.badge + h3 {
    margin-top: 8px;
    color: #172550;
}
HTML 구조는 다음과 같다.
<span class="badge">AI MUSIC</span>
<h3>PNU 감성 플레이리스트</h3><h3>가 .badge 바로 다음에 있으므로 선택된다.
HTML 순서가 다음과 같이 변경되면 선택되지 않는다.
<span class="badge">AI MUSIC</span>
<p>새로운 설명</p>
<h3>PNU 감성 플레이리스트</h3><h3>가 .badge 바로 다음 요소가 아니기 때문이다.
6. 일반 형제 선택자
일반 형제 선택자는 ~ 기호를 사용한다. 특정 요소 뒤에 나오는 같은 부모의 모든 형제 요소를 선택한다.
.badge ~ p {
    color: #747a8a;
}
다음 구조에서 <p>는 .badge 뒤에 있는 형제 요소이므로 선택된다.
<span class="badge">AI MUSIC</span>
<h3>PNU 감성 플레이리스트</h3>
<p>AI가 만든, 부산대의 오늘</p><p>가 .badge 바로 다음에 있을 필요는 없다. 같은 부모를 가지면서 .badge 뒤에 있으면 선택된다.
Section 02. 가상 클래스 선택자
연습 html
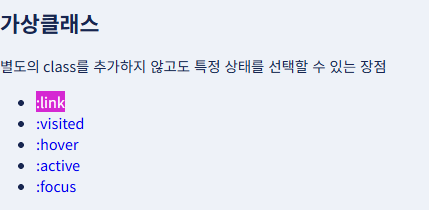
<div class="menu">
        <h2>가상클래스</h2>
        <p>별도의 class를 추가하지 않고도 특정 상태를 선택할 수 있는 장점</p>
        <ul>
            <li><a href="httP://www.naver.com" target="_blank" class="btn01">:link</a></li>
            <li><a href=# class="btn01">:visited</a></li>
            <li><a href=# class="btn01">:hover</a></li>
            <li><a href=# class="btn01">:active</a></li>
            <li><a href=# class="btn01">:focus</a></li>
        </ul>
    </div>
1. 가상 클래스란?
가상 클래스는 요소의 상태나 구조적 위치를 기준으로 요소를 선택한다. 가상 클래스 이름 앞에는 콜론 :을 작성한다.
선택자:가상클래스 {
    속성: 값;
}
예를 들어 사용자가 링크 위에 마우스를 올렸을 때 스타일을 변경하려면 :hover를 사용한다.
a:hover {
    color: purple;
}
가상 클래스는 HTML에 별도의 class를 추가하지 않고도 특정 상태를 선택할 수 있다는 장점이 있다.
2. 링크와 사용자 동작 가상 클래스
| :link | 아직 방문하지 않은 링크이다. |
| :visited | 방문한 적이 있는 링크이다. |
| :hover | 마우스 포인터가 올라간 상태이다. |
| :active | 마우스로 누르고 있는 상태이다. |
| :focus | 키보드나 마우스로 초점을 받은 상태이다. |
3. :hover — 마우스를 올린 상태
카테고리 메뉴
.category-menu a:hover {
    background-color: #5f3ed6;
    color: white;
}
마우스를 카테고리 메뉴에 올리면 배경색과 글자색이 변경된다.
콘텐츠 카드
.content-card:hover {
    border-color: #6546dc;
    background-color: #faf9ff;
}
마우스를 카드 위에 올리면 카드의 테두리와 배경색이 변경된다.
원형 버튼
.round-button:hover {
    background-color: #6240d8;
    color: white;
}
4. :active — 누르고 있는 상태
.category-menu a:active {
    background-color: #2f1a86;
    color: white;
}
사용자가 메뉴를 마우스로 누르고 있는 짧은 순간에 적용된다.
.round-button:active {
    background-color: #291477;
}hover는 마우스를 올려놓은 상태이고, active는 마우스 버튼으로 요소를 누르고 있는 상태이다.
5. :focus — 초점을 받은 상태
링크는 Tab 키를 이용하여 선택할 수 있다. 키보드로 선택된 요소는 초점 상태가 된다.
a:focus {
    outline: 3px solid #ffbd2e;
    outline-offset: 3px;
}outline은 요소 바깥쪽에 강조선을 표시한다. 이는 키보드 사용자가 현재 어느 요소를 선택하였는지 확인할 수 있게 하는 중요한 접근성 기능이다.
초점 표시를 단순히 제거하는 다음 코드는 사용하지 않는 것이 좋다.
/* 접근성 문제가 발생할 수 있다. */
a:focus {
    outline: none;
}
6. 링크 가상 클래스 작성 순서
링크 가상 클래스는 다음 순서로 작성하는 것이 일반적이다.
a:link {
    color: #172550;
}

a:visited {
    color: #584978;
}

a:hover {
    color: #6546dc;
}

a:active {
    color: red;
}
:link → :visited → :hover → :active이를 LVHA 순서라고 기억할 수 있다.
다만 현재 종합예제에는 버튼 형태의 링크가 많으므로 전체 a 요소보다 특정 영역의 링크에 적용하는 것이 안전하다.
.user-menu a:link {
    color: #172550;
}

.user-menu a:visited {
    color: #172550;
}

.user-menu a:hover {
    color: #6546dc;
}
Section 03. 구조 가상 클래스
구조 가상 클래스는 HTML 문서에서 요소가 위치한 순서와 구조를 기준으로 요소를 선택한다.
<h2>구조가상클래스</h2>

<div class="category-menu">
    <a href="#">♫ MUSIC</a>
    <a href="#">▶ VIDEO</a>
    <a href="#">● ART</a>
    <a href="#">♬ PODCAST</a>
</div>| 가상클래스 | 선택 대상 |
| :first-child | 형제 요소 중 첫 번째 요소 |
| :last-child | 형제 요소 중 마지막 요소 |
| :nth-child(n) | 형제 요소 중 n번째 요소 |
| :nth-child(odd) | 홀수 번째 요소 |
| :nth-child(even) | 짝수 번째 요소 |
| :nth-last-child(n) | 뒤에서 n번째 요소 |
1. :first-child
형제 요소 중 첫 번째 요소를 선택한다.
.category-menu a:first-child {
    margin-left: 0px;
    background: #d528d2;
}
.category-menu 안에 있는 링크 중 첫 번째 링크인 MUSIC이 선택된다.
<div class="category-menu">
    <a href="#">♫ MUSIC</a>
    <a href="#">▶ VIDEO</a>
    <a href="#">● ART</a>
    <a href="#">♬ PODCAST</a>
</div>
2. :last-child
형제 요소 중 마지막 요소를 선택한다.
.category-menu a:last-child {
    margin-right: 0px;
    background-color: #ffbd2e;
}
네 번째 카드의 오른쪽 여백만 제거한다.
3. :nth-child()
형제 요소 중 특정 순서에 있는 요소를 선택한다.
.category-menu a:nth-child(2) {
    border-bottom: 3px solid rgb(189, 10, 10);
    text-decoration: none;
}
두 번째 콘텐츠 카드를 선택한다.
홀수 번째 카드 선택
.content-card a:nth-child(odd) {
    background-color: #fafaff;
}
짝수 번째 카드 선택
.content-card a:nth-child(even) {
    background-color: #f3f6ff;
}
세 번째 카드 선택
.category-menu a:nth-child(3) {
    border-bottom: 3px solid rgb(189, 10, 10);
    text-decoration: none;
}
처음 두 카드 선택
.category-menu a:nth-child(-n+2){border-top:4px solid red;}입문 단계에서는 숫자, odd, even을 중심으로 학습하는 것이 적절하다.
📝 예제: 콘텐츠 현황 대시보드
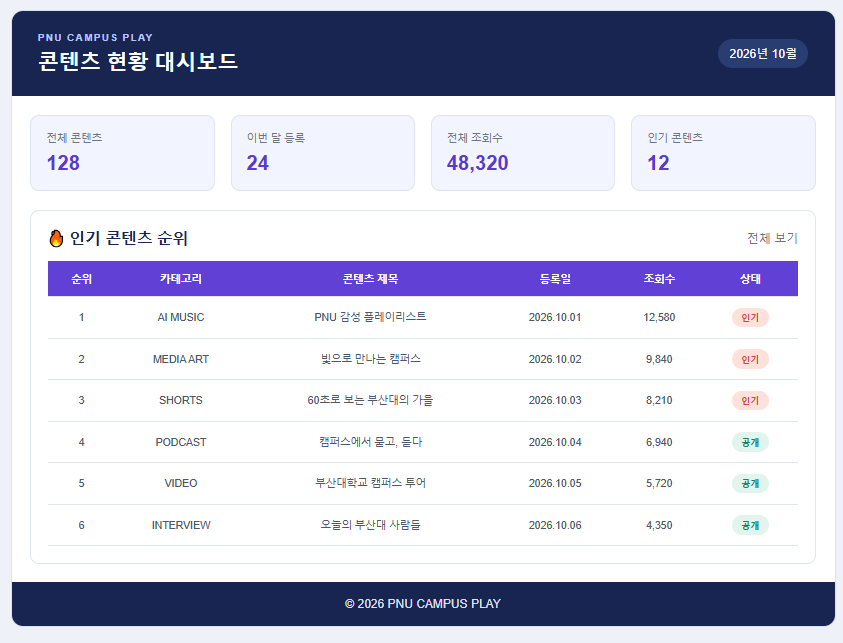
HTML 작성
<!DOCTYPE html>
<html lang="ko">

<head>
    <meta charset="UTF-8">
    <meta name="viewport" content="width=device-width, initial-scale=1.0">
    <title>PNU 콘텐츠 대시보드</title>
    <link rel="stylesheet" href="css/board.css">
</head>

<body>
    <div id="dashboard">
        <header>
            <div class="title-area">
                <p>PNU CAMPUS PLAY</p>
                <h1>콘텐츠 현황 대시보드</h1>
            </div>
        </header>

        <main>
            <section class="summary">
                <div class="summary-card">
                    <span>전체 콘텐츠</span>
                    <strong>128</strong>
                </div>

                <div class="summary-card">
                    <span>이번 달 등록</span>
                    <strong>24</strong>
                </div>

                <div class="summary-card">
                    <span>전체 조회수</span>
                    <strong>48,320</strong>
                </div>

                <div class="summary-card">
                    <span>인기 콘텐츠</span>
                    <strong>12</strong>
                </div>
            </section>

            <section class="table-section">
                <div class="section-title">
                    <h2>🔥 인기 콘텐츠 순위</h2>
                    <a href="#">전체 보기</a>
                </div>

                <table>
                    <caption>
                        PNU CAMPUS PLAY 콘텐츠별 조회 현황
                    </caption>

                    <thead>
                        <tr>
                            <th>순위</th>
                            <th>카테고리</th>
                            <th>콘텐츠 제목</th>
                            <th>등록일</th>
                            <th>조회수</th>
                            <th>상태</th>
                        </tr>
                    </thead>

                    <tbody>
                        <tr>
                            <td>1</td>
                            <td>AI MUSIC</td>
                            <td>PNU 감성 플레이리스트</td>
                            <td>2026.10.01</td>
                            <td>12,580</td>
                            <td><span class="status">인기</span></td>
                        </tr>

                        <tr>
                            <td>2</td>
                            <td>MEDIA ART</td>
                            <td>빛으로 만나는 캠퍼스</td>
                            <td>2026.10.02</td>
                            <td>9,840</td>
                            <td><span class="status">인기</span></td>
                        </tr>

                        <tr>
                            <td>3</td>
                            <td>SHORTS</td>
                            <td>60초로 보는 부산대의 가을</td>
                            <td>2026.10.03</td>
                            <td>8,210</td>
                            <td><span class="status">인기</span></td>
                        </tr>

                        <tr>
                            <td>4</td>
                            <td>PODCAST</td>
                            <td>캠퍼스에서 묻고, 듣다</td>
                            <td>2026.10.04</td>
                            <td>6,940</td>
                            <td><span class="normal">공개</span></td>
                        </tr>

                        <tr>
                            <td>5</td>
                            <td>VIDEO</td>
                            <td>부산대학교 캠퍼스 투어</td>
                            <td>2026.10.05</td>
                            <td>5,720</td>
                            <td><span class="normal">공개</span></td>
                        </tr>

                        <tr>
                            <td>6</td>
                            <td>INTERVIEW</td>
                            <td>오늘의 부산대 사람들</td>
                            <td>2026.10.06</td>
                            <td>4,350</td>
                            <td><span class="normal">공개</span></td>
                        </tr>
                    </tbody>
                </table>
            </section>
        </main>

        <footer>
            <p>© 2026 PNU CAMPUS PLAY</p>
        </footer>
    </div>
</body>

</html>
CSS
/* 전체 선택자 */
* {
    box-sizing: border-box;
}


body {
    margin: 0;
    background-color: #eef2f8;
    color: #172550;
}

a {
    color: inherit;
    text-decoration: none;
}

#dashboard {
    width: 1100px;
    margin: 40px auto;
    background-color: white;
    border: 1px solid #dce2ed;
    border-radius: 16px;
    overflow: hidden;
}

/* 상단 영역 */
header {
    padding: 28px 35px;
    background-color: #172550;
    color: white;
}

.title-area
 {
    display: inline-block;
    vertical-align: middle;
    font-size: 16px;
}

.title-area p {
    margin: 0 0 5px;
    color: #b8c6ff;
    font-size: 13px;
    font-weight: bold;
    letter-spacing: 2px;
}

.title-area h1 {
    margin: 0;
    font-size: 28px;
}


/* 본문 영역 */
main {
    padding: 25px;
}

/* 요약 카드 */
.summary {
    margin-bottom: 25px;
    font-size: 0;
}

.summary-card {
    display: inline-block;
    width: 23.5%;
    margin-right: 2%;
    padding: 20px;
    background-color: #f2f4ff;
    border: 1px solid #e0e4f2;
    border-radius: 12px;
    font-size: 16px;
}

.summary-card:last-child {
    margin-right: 0;
}

.summary-card span {
    display: block;
    margin-bottom: 10px;
    color: #6d7486;
    font-size: 14px;
}

.summary-card strong {
    color: #5939ce;
    font-size: 27px;
}

/* 테이블 영역 */
.table-section {
    padding: 22px;
    border: 1px solid #e0e4ec;
    border-radius: 12px;
}

.section-title {
    margin-bottom: 16px;
    font-size: 0;
}

.section-title h2,
.section-title a {
    display: inline-block;
    vertical-align: middle;
    font-size: 16px;
}

.section-title h2 {
    width: 80%;
    margin: 0;
    font-size: 21px;
}

.section-title a {
    width: 20%;
    color: #6d7486;
    text-align: right;
}

table {
    width: 100%;
    border-collapse: collapse;
}

caption {
    overflow: hidden;
    width: 1px;
    height: 1px;
}

th,
td {
    padding: 14px 12px;
    border-bottom: 1px solid #e1e5ee;
    font-size: 14px;
    text-align: center;
}

th {
    background-color: #6040d5;
    color: white;
}

td {
    color: #4e566a;
}

/* 상태 표시 */
.status,
.normal {
    display: inline-block;
    min-width: 50px;
    padding: 5px 10px;
    border-radius: 14px;
    font-size: 12px;
    font-weight: bold;
}

.status {
    background-color: #ffe1dc;
    color: #d5442f;
}

.normal {
    background-color: #e1f5ec;
    color: #16815e;
}

/* 하단 영역 */
footer {
    padding: 20px;
    background-color: #172550;
    color: #dce3f7;
    text-align: center;
}

footer p {
    margin: 0;
}
/* 첫 번째 열 */
th:first-child,
td:first-child {
    width: 70px;
    font-weight: bold;
}

/* 마지막 열 */
th:last-child,
td:last-child {
    width: 90px;
}

/* 짝수 데이터 행 */
tbody tr:nth-child(even) {
    background-color: #f6f7fb;
}

/* 상위 3개 행 */
tbody tr:nth-child(-n+3) td:first-child {
    color: #6040d5;
    font-size: 18px;
}

/* 첫 번째 순위 */
tbody tr:first-child td:first-child {
    color: #e44c38;
    font-size: 21px;
}

/* 마지막 행의 아래쪽 테두리 제거 */
tbody tr:last-child td {
    border-bottom: none;
}

/* 마우스가 올라간 행 */
tbody tr:hover {
    background-color: #e9e5ff;
}:first-child로 첫 번째 열 강조하기
테이블에서 각 행의 첫 번째 셀은 순위를 나타낸다. :first-child를 사용하면 모든 행의 첫 번째 열을 선택할 수 있다.
th:first-child,
td:first-child {
    width: 70px;
    font-weight: bold;
}th:first-child는 각 행의 첫 번째 <th>를 선택하고, td:first-child는 각 행의 첫 번째 <td>를 선택한다.
1위 행의 순위를 특별히 강조하려면 다음과 같이 작성할 수 있다.
tbody tr:first-child td:first-child {
    color: #e44c38;
    font-size: 20px;
}
선택자의 의미는 다음과 같다.
tbody 안의 첫 번째 tr 안에 있는 첫 번째 td:last-child로 마지막 열 강조하기
각 행에서 마지막 셀은 콘텐츠 상태를 나타낸다.
th:last-child,
td:last-child {
    width: 90px;
}
마지막 행의 테두리를 제거할 수도 있다.
tbody tr:last-child td {
    border-bottom: none;
}
이 선택자는 <tbody> 안의 마지막 <tr>에 포함된 모든 <td>를 선택한다.
:nth-child(even)으로 줄무늬 테이블 만들기
짝수 번째 행에 다른 배경색을 지정하면 행을 구분하기 쉬운 줄무늬 테이블을 만들 수 있다.
tbody tr:nth-child(even) {
    background-color: #f6f7fb;
}:nth-child(odd)로 홀수 행 선택하기
tbody tr:nth-child(odd) {
    background-color: white;
}odd는 홀수 번째 요소를 의미한다.
짝수 행과 홀수 행을 함께 지정할 수도 있다.
tbody tr:nth-child(odd) {
    background-color: white;
}

tbody tr:nth-child(even) {
    background-color: #f6f7fb;
}:nth-child(n)으로 특정 행 선택하기
두 번째 행을 선택하려면 다음과 같이 작성한다.
tbody tr:nth-child(2) {
    color: #4d35bd;
}
세 번째 행의 모든 셀을 강조하려면 다음과 같이 작성한다.
tbody tr:nth-child(3) td {
    font-weight: bold;
}
상위 3개 콘텐츠 강조하기
-n+3을 사용하면 첫 번째부터 세 번째 요소까지 선택할 수 있다.
tbody tr:nth-child(-n+3) {
    background-color: #f0edff;
}
-n+3 → 1, 2, 3번째 요소상위 3개의 순위 셀만 강조하려면 다음과 같이 작성한다.
tbody tr:nth-child(-n+3) td:first-child {
    color: #6040d5;
    font-size: 18px;
}nth-child()와 first-child를 조합한 선택자이다.
:nth-last-child()로 뒤에서 선택하기
nth-last-child()는 마지막 요소부터 순서를 계산한다.
tbody tr:nth-last-child(2) {
    color: #7c8290;
}
위 선택자는 뒤에서 두 번째 행을 선택한다.
마지막 두 개의 행을 선택하려면 다음과 같이 작성한다.
tbody tr:nth-last-child(-n+2) {
    color: #8a8f9c;
}
입문 과정에서는 first-child, last-child, nth-child()를 우선 학습하고 nth-last-child()는 확장 내용으로 다루는 것이 적절하다.
마우스 동작 추가하기
:hover는 구조 가상 클래스가 아니라 사용자 동작 가상 클래스이다. 그러나 테이블의 사용성을 높이기 위하여 함께 적용할 수 있다.
tbody tr:hover {
    background-color: #e9e5ff;
}
마우스를 올린 행의 배경색이 변경되므로 사용자가 현재 확인하는 데이터를 쉽게 구분할 수 있다.
링크에 키보드 초점 표시도 추가할 수 있다.
a:focus {
    outline: 3px solid #ffbf3f;
    outline-offset: 3px;
}
구조 가상 클래스 완성 코드
다음 코드를 기존 CSS의 테이블 영역 아래에 추가한다.
/* 첫 번째 열 */
th:first-child,
td:first-child {
    width: 70px;
    font-weight: bold;
}

/* 마지막 열 */
th:last-child,
td:last-child {
    width: 90px;
}

/* 짝수 데이터 행 */
tbody tr:nth-child(even) {
    background-color: #f6f7fb;
}

/* 상위 3개 행 */
tbody tr:nth-child(-n+3) td:first-child {
    color: #6040d5;
    font-size: 18px;
}

/* 첫 번째 순위 */
tbody tr:first-child td:first-child {
    color: #e44c38;
    font-size: 21px;
}

/* 마지막 행의 아래쪽 테두리 제거 */
tbody tr:last-child td {
    border-bottom: none;
}

/* 마우스가 올라간 행 */
tbody tr:hover {
    background-color: #e9e5ff;
}
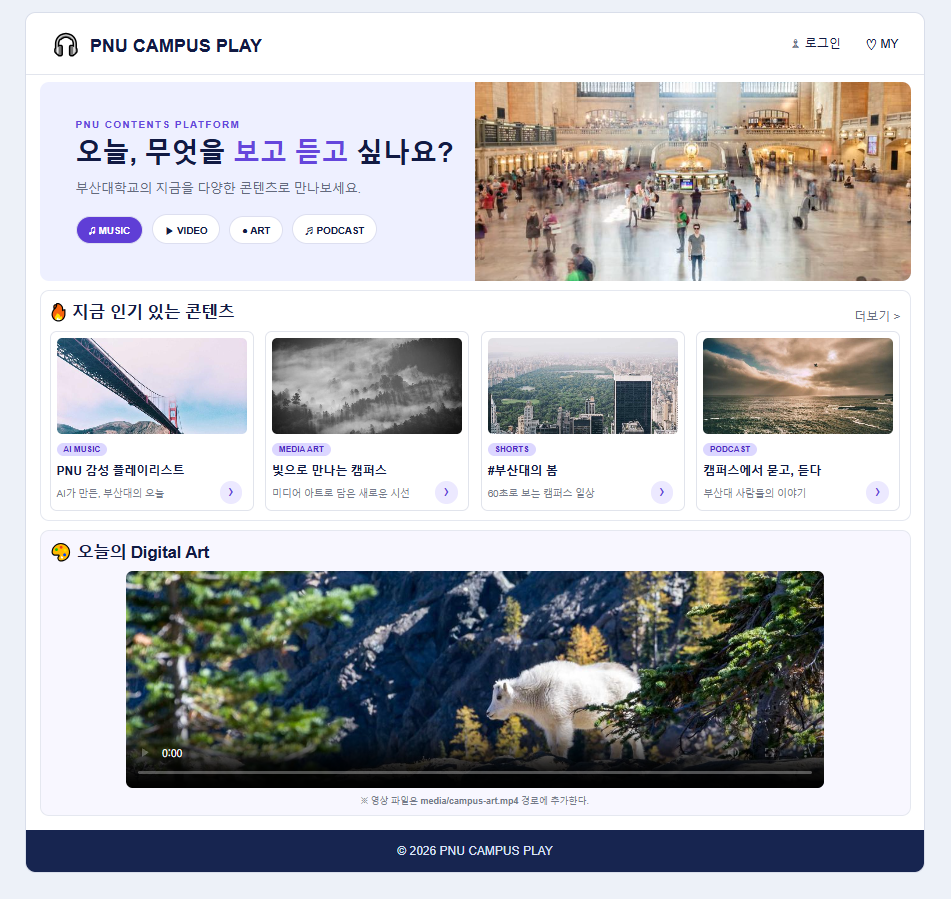
🧩 종합예제
첨부 화면을 참고하여 전체 HTML과 CSS를 작성 해 보자.
- Total
- Today
- Yesterday
- 컴퓨팅사고력
- matplotlib
- python
- 안드로이드
- 엑셀
- 피그마
- 파이썬
- 데이타R지
- 라이브러리
- UX
- 자바스크립트
- 관계자분석
- Idle
- MOS365
- 휴리스틱평가
- 초보자를 위한 텍스트마이닝
- 파이썬 기초
- 챗GPT
- HCI
- 챗봇
- 엑셀365
- UI
- figma
- pygame
- 데이터R지
- HTML
- 텍스트마이닝
- 프로토타입
- 파이썬기초
- mos expert
| 일 | 월 | 화 | 수 | 목 | 금 | 토 |
|---|---|---|---|---|---|---|
| 1 | 2 | 3 | ||||
| 4 | 5 | 6 | 7 | 8 | 9 | 10 |
| 11 | 12 | 13 | 14 | 15 | 16 | 17 |
| 18 | 19 | 20 | 21 | 22 | 23 | 24 |
| 25 | 26 | 27 | 28 | 29 | 30 | 31 |